Thursday, December 16, 2010

Realistic Fiction Charts to Support Student Independence

Are you in the midst of your realistic fiction writing unit?  Are you looking for ways to support students to work independently on strategies you have taught in minilessons?  You may want to make some charts with your students to do the following:

1.  Track your teaching points - the big ideas of your teaching points - in language the kids can remember and read.
2.  Give clear examples of the teaching points.
3.  Provide language or prompts to help them get started with parter talk or the next step of the writing process.

Of course, there are many possible charts you could make in this unit.  Here are a few I have used with kids in first and second grade classrooms in Manhattan that support independent work based on the three things I mentioned above.

Below:  An example of a chart that tracks some of the big teaching points.

Below:  The next two charts give students some of the language they can use 
while working with their writing partners to work on their fiction stories.


The chart below shows students ways they can "show and not tell" in realistic fiction stories.  These are the same strategies many students used in narrative writing.  Under each strategy are two post-it notes.  The small one is an example of the "tell," what I could say in my story.  Next to it is the more elaborate, "show" post-it, showing what it would look like to get that message across to my reader when I use that elaboration strategy.

 Below:  Close ups of the demo writing on the post-its from the chart above.  The character I have been using in my demonstration writing is Essie, a young girl who loves football and has just moved to her new neighborhood.  She is searching for new friends and her mom wants her to try some new activities.  In one of my stories she refuses to go to dance class.  The examples on the chart are from that story.

Post-it Folders for Readers at Levels A-I

Are you wondering how to support your students to talk about books with partners?  You might notice that your students are good at sharing the reading time during partner time, but talking about the books seems more difficult.  Perhaps your students are language learners or perhaps they are unsure how to talk about books with friends.  Maybe the kids don't know how much FUN talking about books can be!  This tool might just be the thing to support your teaching and the kids' talk.  It is a simple post-it note holder!

You can try using this post-it note holder tool with your readers at levels A-I.  Read on for tips on how to teach your young readers how to use this tool to have good conversation.


Model for students the different ways readers can talk about books in Read Aloud time.  Show them how you can mark pages where you and the students were surprised, scared for the characters, full of ideas about the text, etc.  You can create icons with the kids to represent these different ways of thinking just as Kathy Collins teaches us in Growing Readers.  Then put these icons on post-it notes and model placing these in the book as you read, think, and talk with the students.

You'll also want to talk about reading books with other people in your own life.  Talk about your book club meetings you attend and how you and your own reading buddies mark pages to talk about with one another.  Tell the kids how embarrassed you would be if you went to the club with no post-its!  My own book club life give me lots of stories to tell in my minilessons!

Invite the students to make their own post-it note folders or holders.  First grade teachers and I in Queens use simple file folders, post-its, and markers with the students.  The kids the keep this folder in their book baggie or book box so the post-its are reusable and do not get lost, smashed, ripped, etc.

Each day, as students read during independent reading time, coach them to have their post-it folder nearby so they can mark pages in their books to talk about with their partners during partner time.

You may also want to put the talk prompt near the post-it in the folder so when they have partner time, they can remember how to start their conversation.  We placed the matching icon on the folder so kids can match up their post-it in their book with the prompt in the folder.

At the end of each reading workshop (after partner time is over), kids can take the post-its off the pages they marked and place them back into their post-it folders for the next day.

Sunday, November 7, 2010

Partnerships and Post-its: Make Comprehension Visible (Part 2)

The post, Partnerships and Post-its: Make Comprehension Visible Part 1, gave you some ideas to get your partner time back on track.  This post will help you invent some new ways for kids to get ready for their partner time.

In a nutshell, I have been asking kids, reading at level J and above, during reading conferences one or more of following questions:

  • What ideas are you getting in your book right now?
  • What do you think the author want to make you think or believe right now?
  • How are you planning to keep track of your thinking in this book?
  • What are you planning to share with your partner?
Please note, you can ask these questions of readers at lower levels but there may be other strategies you are concerned about as well.

The young readers and I have been inventing some really fun and exciting ways to keep track of their thinking, gather new ideas, and get ready for partner time.  Here are some of the ways the kids can share.  Please keep in mind this is NOT the only way to collect post-its to prepare for partner time.  These are the ways kids invented after rereading their initial post-its and thinking about their books.


Let me show you some of these ideas up-close.
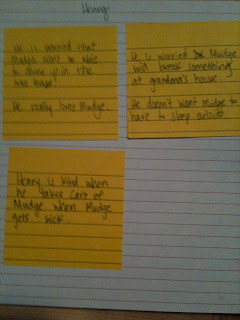
Collect post-its about characters and get ideas about the characters.  First, invite kids to read a few books with the same character.  After they finish reading a book or two, reread the post-its they have so far and ask, "What's the same about these jots?"  Then, get an idea.  Finally, read some more books with the same character with that idea in mind.  See the example of this process below from Henry and Mudge.


Above:  Post-its collected and then students reread them.

Below:  Students developed this idea after asking themselves, "What's the same about these jots?"  
Now they are ready to read on and look for places in other texts to support this idea.  
Or, perhaps they will grow the idea or get a new one.


Collect post-it about the character's journey.  Many realistic fiction stories or narrative nonfiction books are journeys.  One way you can post-it is to read the blurb on the back of the book and/or the jacket cover to learn what the journey will be.  Then, you can collect post-its to follow the journey.  These post-its look like retelling post-its but they can help young readers accumulate text and talk about the main idea, the journey.  They also support thinking about compare and contrast because usually the character does some changing by the end of the journey.
Above:  Post-its to talk about the beginning of Amber Brown's journey.


Last week a second grade told me that The Magic Tree House books were so great and she loved their predictable structure.  She decided to turn to a clean page in her reading notebook and make a four column chart (across 2 pages of the notebook like the journey page above).  She said, "Magic Tree House books always have the characters going somewhere.  Then they have to get away or hide from an evil character, then they have to get something to bring back, and finally they have to escape."  She proceeded to label her column with those 4 headings, "Going, Hiding, Getting, and Escaping."  She decided she would begin by collecting post-its for each part to help her talk about the books with her partners.  I hope I'll have a photo here for you soon!  

The reason why I share this story, is because I want you to know that the ways I have shared above are not the only ways kids can collect jots.  They can and should invent their own ways with you - especially ways that will help them do what readers at this level do:
Monitor for meaning in these longer texts.
Accumulate text while thinking about the main idea.
Make inferences about the characters and begin to develop ideas and then theories.
Consider author's intent and think about the big message of the text.

Happy reading and talking with your students!


Partnerships and Post-its: Make Comprehension Visible in Second Grade (Part 1)

Are you wondering about how to make your reading workshop partner time better?

One thing you can do is wrap some structure around the time.  Remind the kids of all they know how to do during partner time already.  Brainstorm a list of things they learned last year.  Here are two charts that teachers made with their students.  I love some of the ideas they invented together!


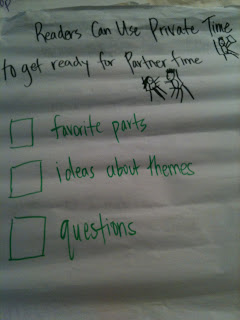
This chart uses what kids already know and then reminds them to use their private time to get ready for their partner time.


Take Kathy Collins's advise in Reading for Real and stop your students a few minutes before the private time ends.  Say something like, "Readers, we have two minutes before partner time.  Get ready for partner time.  Mark the pages you want to share, maybe even reread a little on that page so you'll have ideas to share."

Now...  this leads us to big question #2...
Are you wondering how to help your kids collect some jottings about their thinking in reading workshop on those post-its?

Many teachers and I have been thinking about this too, especially as we have kids reading in books and Level J and above.  It seems like the work they need to do as readers is the following:

  • Monitor for meaning in these longer texts.
  • Accumulate text while thinking about the main idea.
  • Make inferences about the characters and begin to develop ideas and then theories.

As teachers and I look at the post-its kids are collecting, we currently see some post-its that look like...

A Retelling
Sometimes these post-its are about favorite parts, funny parts, or scary parts.

A Prediction


Some teachers use a chart that looks like the one above to remind kids of the way predictions sound.


A Statement about a character or a fact from an information book.  


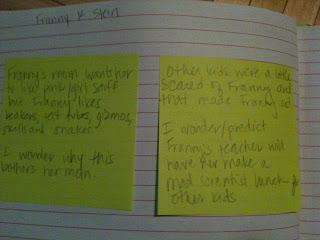
Sometimes these statements sound like ideas.  I made the following mentor post-its with some students during a read aloud of the Houndsley and Catina series by James Howe.  We retold and THEN pushed ourselves to have an idea about the character.  We said, "This makes me think..." and then we jotted.  Click on this photo to see a larger view.

One of the post-its close up:

We found more students collecting post-its with retellings AND ideas after this modeling.  We also carried these post-its around the room with us during conferring time so we could remind students what this kind of thinking looks like.

This is just the beginning.  Remember, the main points of collecting your thoughts on post-its its it to do two things:
1.  To have some evidence of the thinking work you are doing during your independent reading time.
2.  To have some jottings to use to support a conversation when you get together with your partner during partner time.

If you students don't have any way to record their thoughts as they read, you'll want to share with them some of the ways that readers do this.  You can use read aloud as a time to model this as well as your reading minilessons.  You might even have a chart that reminds kids of the different ways they can collect jottings as they read.  See the next post on post-its and partners to help you imagine this!

Saturday, October 9, 2010

Teaching High Frequency Words

Many teachers have been asking this week about the best ways to teach high frequency words.  Here is my number one tip:

Give students many opportunities to read and write the word.

Several teachers have taught me fun activities to give kids opportunities to read and write their "words of the week."  Here are some of my favorites.

Write It and Read It


Marie Clay developed a quick way to practice reading and writing a new word as part of a reading recovery lesson.  Teachers can use this same procedure whole class by passing out white boards and dry erase markers on the rug.
1.  Make the word with magnetic letters and ask the kids to read it.
2.  Kids make the word and read it as they write it in the upper left hand corner of their boards.  Then erase.
3.  Kids repeat the writing of the word in the upper right hand corner, in the bottom left corner, in the bottom right corner, and in the middle; reading it each time as they write it and after they write it.
4.  In the end, you can invite kids to write it little at the center of the board, and then write it big.  Prompt them again to say the word as they write it and then read it after they write it.

Find the Word in Shared Reading Books and Our Own Books
Many teachers see kids reading or writing their high frequency words in isolation but not independently. Shared reading is a great place to teach toward the transfer.  If you need more support with planning shared reading with a big book across a week, read Read It Again!  For a list of shared reading big books at levels A-G, see the post on Big Books and Small Copies for Emergent Readers.  After reading a familiar big book, perhaps the third day out of a four or five day shared reading plan, invite kids to read the book with you again and search for the words of the week in the book.  
  • Use highlighting tape or wiki sticks to show the word.
  • Place the word on a notecard or cut out piece of sentence strip on the easel so kids can match the word of the week that is on the card with the word in the book.
  • Encourage students to find these words of the week in their own books.
  • After you look for the words in the shared reading, go to the word wall (see Patricia Cunningham's work) with the class and place the words on the wall with the students.  Ask for their input.  Stacy is pictured below with her kindergarten class, placing their words on the wall.  Her literacy coach Barbara says, "It's an event!  It's so exciting!"  She is right.  Budding readers and writers get excited to know more words by heart.  You can ask your kids some of the questions below as you put the word up on the wall:
    • "Where should we put this word on our wall so we can find it when we need it?"
    • "What is the first letter?" and "Where is that letter on our word wall?"


Words of the Week Hide and Go Seek
This is a fun one - for you and the kids!  I saw it in Union County North Carolina in a kindergarten and fell in love with the amount of practice kids got to learn the words.  Students will need a clipboard, a pencil, and a post-it for each of your words of the week.  

1.  Invite students to write each word of the week on a post-it.  If you have three words of the week, let's say the, it, and he, then each child will write the on the first post-it, it on the second post-it, and he on the third post-it.  Coach the students who need support with letter formation as they write.
2.  Give students about 30 seconds to walk around the room and hide their post-its.  Yes, you will have perhaps 75 post-its all over your tables, walls, and furniture!  Encourage the kids to put the post-its in fun places, but not in places where someone might bump their head or hurt their arm reaching for it.
3.  Call the kids back to the rug and invite them to get their reading fingers (their index or pointer fingers) ready to read the words all around the room.  
4.  Send the kids off to "seek."  Tell them to look for post-its with the words of the week and when they find one, they should walk up to it, tap their reading finger under it (preferably under the first letter), and read it out loud.  Then leave the post-it for the next person to read.  Tell them to look for as many post-its as possible.  

You can do this activity for a few minutes.  Listen to the students as they practice.  Encourage them to point under the first letter as they read.  Some kids may need to carry a clipboard with the words on it already and match the words around the room to the words on the clipboard.  This would be a point of access for just a few kids as needed.  You can also encourage kids to look at charts and signs around the room to "seek" for the word too.  

Thursday, October 7, 2010

Teaching Oliver to Read: A Little Humor


Meet Oliver, The Reading Dog

I have been promising you readers a humorous post.  So, here it is.  Some of you may know the story of Oliver, the dog belonging to my friends Gina and David.  Some of you may know that for one weekend a few years ago I became interested in teaching Oliver to read.

It began with a handful of dog treats and two post -it notes, one with Oliver's name on it, and one with the name of Oliver's best friend on it.  We placed the two post-its on the coffee table with treats (now carrots) on top of his own post-it and first taught Oliver to "read his name."  He began to tap the post-it with his paw or nudge the post-it with his nose.  We then worked hard to teach Oliver to "read the post-it" with only his name.  

After a good night's sleep, Oliver woke the next morning and greeted his dad on the couch.  David spread the newspaper out on the coffee table and Oliver wagged his tail wildly.  He began tapping the paper and sniffing it.  David, not a teacher, but around enough teachers to know what to say, pet Oliver on the head and said, "Buddy, I know you want to read again but I think the newspaper is too hard for you.  It is at a high reading level buddy.  I'll read it to you."  Nevertheless, we knew Oliver loved reading.  

Gina, David, Oliver, and I continued our fun that weekend, practicing the trick for a few minutes throughout the two days.  He continues to love read alouds by Gina and walks around his newly remodeled home telling visitors of the stories of each project (in howls, of course).   Now, when I return to the midwest, I always stop home to visit my furry reader and writer.  

Here is a recent portrait of Oliver.  He posed for this after telling me the story of his mom and dad's wedding this April.  He thought it was beautiful.


Wednesday, September 29, 2010

Get Word Study Up and Running

Some teachers have asked me to post charts or photos of the word study routines that other teachers have used while teaching with Words Their Way Resources.

Remember that before you begin your word study work, you will want to assess your students to determine their spelling stage.  You can use the Spelling Inventory in the back of the Words Their Way guidebook.

Then, you'll need to read about the activities appropriate for each stage and get the sorts or other materials to match those activities.  I think the teacher resource guides are the most helpful.  You'll want to be sure you get the right guide to match the stage(s) where your students need to work.  The stages are as follows (with links for the teacher guidebooks):

After that, you'll want to read about the work your children will do in this stage and decide on a 4-5 day word study routine for your class.  Marcella and her colleagues decided on the following routine for second grade students.  Most of the students were in the Letter Name Alphabetic Stage or the Within Word Pattern Stage.  This meant students could do more written recording in word study notebooks.  Photos from Marcella's room are featured below.


Marcella also made the shelf below with bins for each small group in her classroom.  Students have a notebook for recording their work, and a folder that holds baggies or envelopes with their sorts.


Monday, September 27, 2010

Video Tips for Parents

Parents may be wondering how to support kids with reading and writing.  I have shared some of my tips on NBC's Today Show.

Here are two video links to those segments:


TODAY
Teachers’ tips for struggling students
  Statistics show that a child drops out of school every 11 seconds. Experts share advice on how you can keep your child interested in school at a young age.


http://today.msnbc.msn.com/id/39154226/vp/39382302#39382302


This segment highlights some of the issues kids encounter in primary grades and tips for parents to support their children.  Here are a few of the tips:


1.  If your child says, "I don't like reading," it may be that we just have not found the right books for the child.  You can do the following things:

  • Find out your child's reading level by asking the teacher.  Find books on your child's level.  She may not like reading because the books in her hands are frustrating.  If you get her matched to books at her level, the frustration will lessen and the joy will increase.
  • Find out the topics your child loves and then search for texts about those topics at the library and bookstore.  Ask the librarian or specialist in the children's section at the store to help you find the right texts.
2.  If your child has trouble decoding or what appears to you as actually reading the words on the page, there are things you can say and do to support them.  Here are a few things:
  • Give some wait time.  Count to three or five in your mind.  Let the child read on to the end of the sentence.  They often will be bale to self-correct their own error.
  • If they do not notice their error or have trouble self-correcting it, you can ask, "What strategy can you try?"  or one of the following:
    • "What word would make sense here?"
    • "What word would sound right here?"
    • "Take a look at that part of the word." (point to a part that you think they may know)
3.  If your child has trouble with reading comprehension, meaning she can read all the words just fine but has trouble retelling the text or making inferences (how/why questions for example), here are a few things you can do:
  • Be a reading partner to your child.  Read some of the same books your child is reading.  Then, after your child finishes a chapter or a section of the text, ask her to retell it to you or as a few how or why questions.  You can use the questions below in any book to start up conversation.  Remember, you want to start a conversation, not give a multiple choice test about the book.
    • In fiction text, you can ask...
      • What just happened?
      • What do you think will happen next?  Why do you think that will happen?
      • How do you think the character feels?  Why do you think he feels that way?
    • In non-fiction text, you can ask...
      • What did you just learn?
      • What do you think about that?
      • How does that compare with the information you read about the topic in other texts?

Sunday, September 19, 2010

Big Books and Small Copies for Emergent Readers

Teachers with emergent readers will want to do plenty of shared reading throughout the school year.  You may be searching for some big books at lower levels or examples of experience charts so students can practice the following concepts about print as well as level A and B reading behaviors:
  • Locating front and back cover.
  • Directionality.
  • Return sweep.
  • Difference between letter and word.
  • Difference between pictures and words.
  • 1 to 1 matching.
  • Locating known high frequency words in the text.
  • Using the picture and meaning to help problem solve tricky parts.
Pictured below is a basket of familiar shared reading in small copies for emergent readers to reread during reading workshop:

Pictured below is an example of a familiar experience chart for emergent readers to reread during a read around the room activity during reading workshop:


Here is a list of some favorite big books at level A and B (and some above those levels) and small books to match.

from The Wright Group
Huggles Breakfast (A)                  0780257065
Huggles Can Juggle (A)               0780257073
Huggles Goes Away (A)              0780257081
Dinner (A)                                     0780257049

The Bridge (B)                              0780293649
Mrs. Wishy Washy's Tub  (B)      1404520341***
After School (B)                           0780270193

Dan the Flying Man (C)                1404541470
A Child's Day (C)                         0780245296
A Day at School (C)                     0780245245
Going to School (C)                      0780245237

The Farm Concert (D)                                          
Mr. Grump (D)                             0322039118*
Shopping (D)                                0780245261
The Snow (D)                               078024527X

The Meanies Came to School (E)  0780224035
Splishy-Sploshy (E)                                  ***
Dishy Washy (E)                                      ***
Mrs. Wishy Washy (E)                             ***
Wishy Washy Day (E)                             ***
Fall  (E)                                         0780270177
Spring (E)                                     0780270223

Move Over! (F)                            0780294459
One Stormy Night  (F)                0780208706
Mud Walk (F)                                        ***
The Scrubbing Machine (F)                  ***

*This is sold with a Big Book, 6-pack of small books, cassette, poster and teaching guide.
***  The Mrs. Wishy Washy Collection is purchased as a collection of Big Books under one ISBN Number.

Big Books and Little Copies at level A and B from Heinemann
at http://www.heinemann.com
oks
My Big Bear (lg) Getting Started Lap Book 0-325-01461-2 978-0-325-01461-6

My Family (lg) Getting Started Lap Book 0-325-01463-9 978-0-325-01463-0
My Family (4 pack) 0-325-02337-9 978-0-325-02337-3

Making Soup (lg) Getting Started Lap Book 0-325-01465-5 978-0-325-01465-4
Making Soup (4 pack) 0-325-02339-5 978-0-325-02339-7

The Baby Animals (lg) Getting Started Lap Book 0-325-01467-1 978-0-325-01467-8
The Baby Animals (4 pack) 0-325-02341-7  978-0-325-02341-0

At the Market (lg) Getting Started Lap Book 0-325-01469-8 978-0-325-01469-2
At the Market (4 pack) 0-325-02343-3  978-0-325-02343-4

Over the River (lg) Getting Started Lap Book 0-325-01471-X 978-0-325-01471-5
Over the River (4 pack) 0-325-02345-X 978-0-325-02345-8

Funny Things (lg) Getting Started Lap Book 0-325-01473-6 978-0-325-01473-9
Funny Things (4 pack) 0-325-02347-6 978-0-325-02347-2

Mouse (lg) Getting Started Lap Book 0-325-01475-2 978-0-325-01475-3
Mouse (4 pack) 0-325-02349-2 978-0-325-02349-6

Rex (lg) Getting Started Lap Book 0-325-01477-9 978-0-325-01477-7
Rex (4 pack) 0-325-02351-4 978-0-325-02351-9

Mop (lg) Getting Started Lap Book 0-325-01479-5 978-0-325-01479-1
Mop (4 pack) 0-325-02353-0 978-0-325-02353-3


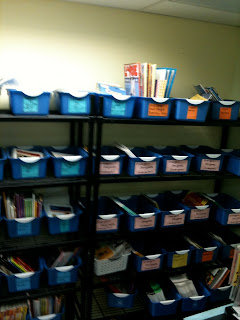
Book Rooms

Many teachers wish to have every book for every unit of study within their grasp and within their closets in their rooms.  But, the reality is, budgets do not permit this.  However, if we share books with colleagues on our grades and among all the grade levels in our school, we can have all the books we need within our grasp at just the moment we need them.

Most schools create book rooms to organize and store materials that teachers can check out and return on an as needed basis.  Schools may decide to have a book room party on a few lunches or evenings to get the room started, label baskets, level books, and arrange shelving.  Then, it is often the case that coaches or a different grade level each month maintains the upkeep of the room.  Most schools also enlist the help of a few parent volunteers to sort and level new books and perhaps to even stop by classrooms to gather books that can go back into the book room.  Special thanks for this post go to coaches Gina and Belinda, as well as the administrators and teachers at OWNCS in Astoria, Queens for organizing this ever-evolving book room for us to see.

To get started, you may want to have some of the following sections:

  • Emergent Story Books
    • 8-10 copies of each title for each Kindergarten classroom.  The photo above is from the OWNCS book room.  The pink labeled baskets are the emergent story books.  This school has three kindergarten classrooms.  Each title has a basket and there are about 18-20 copies of each title.
  • Big Books and Small Copies to Match
  • Above:  The bog books and the corresponding small copies to match each book hang in a small area of the OWNCS book room.
  • Non-Fiction Books
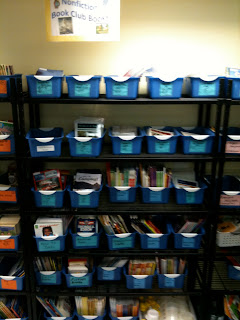
    • Leveled non-fiction topic baskets.  Survey the kids to find out their interests and also shop for books that will match content area teaching.  Some popular baskets are transportation, bugs, sports, birds, sharks, trees, solar system, and human body.
    • The photo above from the OWNCS book room shows topic baskets and the levels for the books in the bin.
  • Character Club books for grades K-2 on levels A-N.
  • Above:  Three of the character bins at OWNCS in Astoria, Queens.  Note the main character as well as the level is labeled on the bucket.  This school has 3 classes on a grade and so coaches ordered 6-8 copies of each title in the bucket.  
    Above:  The character shelves of bins in the OWNCS book room.  Three of the bins are in the photo above, but this photo shows the variety of titles and characters spanning levels A-N for grades K-2.  
    • At least 2 copies of each title for each classroom that will be doing this unit at the same time.  For example, if you have 3 first grade classrooms studying in the character reading club reading unit, you'll want 6 copies of each title. 
  • Book Club Books for Grades 3-5 or 3-8
    • You will want to have books to match the genres and content areas you are teaching.  Some favorites at other schools include mystery, historical fiction, fantasy, science fiction, and social issues.  The shelf pictured above from OWNCS is just one of three whole book shelves devoted to book club books for the students in grades 3-5.  
  • Character focussed books for grades 3-5 or 3-8 on levels K-Z.
    • At least 2 copies of each title for each classroom that will be doing this unit at the same time.
    • Note:  You can use some of the lower level books for 3-5 students reading at lower levels.
  • Guided Reading books or short text to support readers as they make the move (with our support) from one level to the next.

For more support with Book Rooms and shopping for books see the following sources:

What Really Matters for Struggling Readers by Richard Allington

Units of Study for Teaching Reading by Lucy Calkins and Kathleen Tolan


Writing Tools

We all want our students to be independent writers and our kids will be independent if we give them access to the tools they need.  Many teachers use baskets like the ones pictured below to make sure the supplies students need are at their table and within easy reach.  Baskets like these keep the different tools organized and allow students to reach for them at tables rather than walking over to the writing center each time they need something.


Most importantly, kids need a tool to sketch their pictures and write their words.  I like the black flair pens pictured in the red cup on the right.  They allow for the following:
  • Kids to write without having to use a ton of pressure.
  • Kids to write without having to worry about a sharpening a pencil in the middle of writing time.
  • Kids to write without having to stop to erase.  Teachers who provide these pens teach students to cross out words or letters they do not want with one simple line and then to keep on going.
  • Teachers to see all of the children's approximations.  
Students who need color to support their drawing do need colored pencils or markers at their table.  You'll know that they need this support when you see what appears to be scribbles on the page.  Color in the drawing will help these students remember their story when then they reread their sketches and practice orally telling their story across the pages.  Many kindergarten teachers provide tools to add color on their tables but most first and second grade teachers provide these tools only as needed for some students. 

For more supports and advice about writing tools and representational drawing, see the following books:
Talking, Drawing, Writing by Horn and Giacobbe

About the Authors by Katie Wood Ray and Lisa Cleaveland

Launching the Writing Workshop by Calkins and Colleagues (part of the Units of Study in Primary Writing Workshop series)


Thursday, September 16, 2010

Record Keeping

 We could say a lot about record keeping.  Here's the bare bones:

I think teachers want two things out of their record keeping format.

  • Teachers want to see each child's growth across time so they need to see not just this week's goals for a child and his/her progress but also his/her goals and progress across time.
  • Teachers want to see trends in their classroom to help plan minilessons and small groups so they need to be able to see the class as a whole.
And, some teachers like this little extra bit...
  • Some teachers like to have a little cheat sheet or list of possible compliments/teaching points on their record keeping sheets too.  You could carry prompts for each reading level or possible teaching points for each writing unit along side of your record keeping sheet, or these possible teaching points could be on your record keeping sheet.
Take a look at Maureen's record keeping notebook below.  She can see her whole class for this current week and all of the previous weeks.   


Look for more record keeping sheets soon!